
- The Windmill Cube — Overview and Solution Tutorial
- Windmill Cube Notation
- The Basics of Solving It
- The Supercube Adaptations
- Detailed Solving Guide
- Cross
- First Layer
- Second Layer
- Yellow Cross
- Position the Yellow Edges
- Position the Yellow Corners
- Orient the Yellow Corners to Finish The Cube
- Supercube center Orientation Flip
- Как собрать Мельницу | How to Solve the Windmill Cube | Tutorial
- Как собрать Мельницу | How to Solve the Windmill Cube | Tutorial
- ЛЕГКИЙ способ СОБРАТЬ КУБИК ФИШЕРА.
- КАК СОБРАТЬ КУБИК МЕЛЬНИЦУ(WINDMILL CUBE)
- КОМЕНТАРІ • 192
The Windmill Cube — Overview and Solution Tutorial
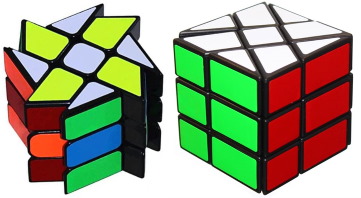
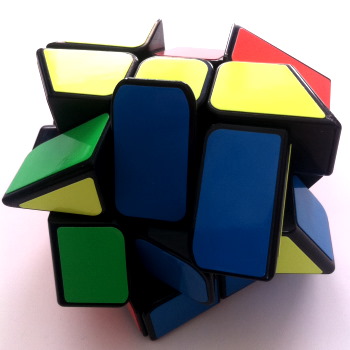
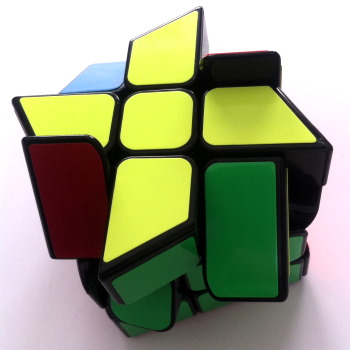
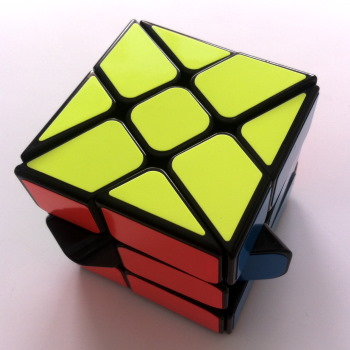
The windmill cube is a 3×3 shape-mod. The cube is a 3×3 cube, but cut diagonally on the white and yellow faces, rather than horizontally like the rest of the cube. It is what is known as a supercube, which means that center rotation matters. So, what that means is that if one of the red, green, blue, or orange (on a windmill cube) centers are rotated by 90° in either direction or 180°, that would not be considered solved. Other than that, the features that distinguish it from a 3×3 are that the sides only have six distinct pieces, which are the center, the two edges above and below it, and the edge and two corners to the side of one of the center rows. The other pieces are there, but are hidden. It is not a WCA official event, although some competitions may have it as an unofficial event.
Windmill Cube Notation
The notation is the same as the 3×3 cube. As it is not an official event, there are no scrambling requirements, but the general consensus is that you should scramble with the white (or the lightest color) face on top, and the green (or next lightest adjacent face to white) facing you.
The Basics of Solving It
The solving method is your 3×3 method, keeping in mind that some corner permutations are very hard to recognize. I find PLL on windmill cubes very hard. So, if you use the beginners 3×3 method, you would start with a white cross, then the white corners. Next, you would insert the second layer edges, then make the yellow cross, permute the corners, and orient them. If you use CFOP, then cross, F2L, OLL, PLL. If you use other methods, then just follow those steps. I don’t recommend using any methods where you have to recognize corner permutation a lot, like the Mehta method.
The Supercube Adaptations
Since it is a supercube, the center orientation matters, as I said above. Therefore, we need algorithms to twist the centers. There are two algorithms, below in the detailed guide, one of which rotates the center by 270° and another which rotates the center by 180°.
Detailed Solving Guide
For this Guide, I will be using the beginners 3×3 method from this website. This is not the only method, as explained above, so feel free to use any other method. I am just using this one so that it is understandable by cubers of all levels, as they will most likely know this method.
Cross
The first step is to create the cross, as seen in this picture. This can be done by making the daisy and double-turning all the pieces into place, or directly solving them. I recommend directly solving them.
First Layer
This step involves inserting all the corners to make the first layer complete. On the windmill cube, it is different to the 3×3, as the corners only have white and one other visible color on them. The other color is invisible, due to how the cube is cut. To check whether the corner has been inserted correctly, check whether the visible corner color and the edge that it matches are on a flat face (ignoring the bump caused by the center being badly oriented.
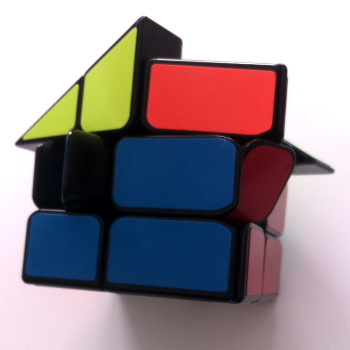
Second Layer
This step inserts the second layer edges. Again, it is different to 3×3, as the edges, like their respective corners, only have one visible color. The invisible color is represented by the odd shape. They can be ‘standing up’, where the longer side of the edge is high, or ‘lying down’, where the longer side of the edge is low. If the longer side is high, then turn the U layer until it is above the matching color. If the longer side is low, then turn the U layer until it is above the color to the other side of the slot. Then insert using the normal algorithm.
These are the two different edge cases.
This is what the finished second layer should look like:
Yellow Cross
This step is identical to the step on 3×3.
Position the Yellow Edges
Position the Yellow Corners
Again, identical to 3×3. The corner recognition is however made a bit harder by the fact that they only have one ‘visible’ color, but it is still pretty easy if you have some experience solving cubes, especially shape mods. When the edges are positioned where they should be, and the edge color matches the face it is above, the corner which shows that color must be placed to the right of that edge if you use white cross and to the left if you use yellow cross.
Orient the Yellow Corners to Finish The Cube
This step is again identical to the on on 3×3 cube; you just need to ensure while doing it that you don’t accidentally move one of the other faces.
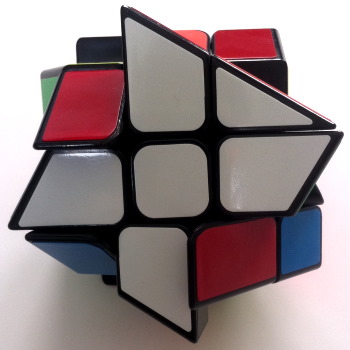
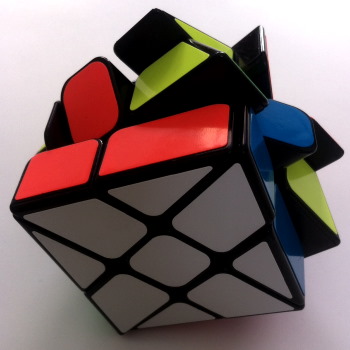
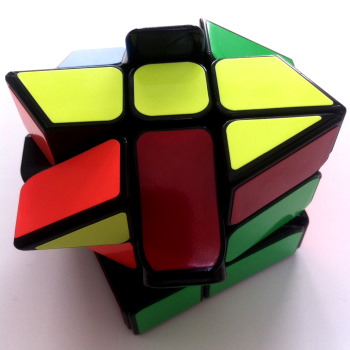
Supercube center Orientation Flip
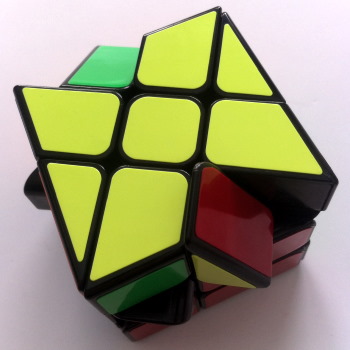
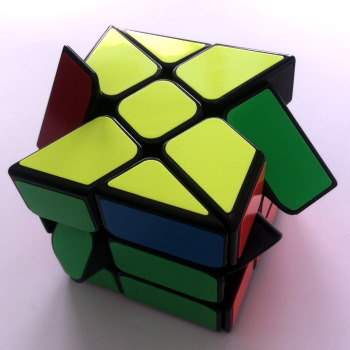
Since it is a supercube, as I mentioned above, center orientation matters just like on picture cubes. There are two algorithms, and by combining them, any of the 3 (actually 4 including the solved case) cases can be solved. The three cases are shown in the pictures below.
The red one shows one of the two center twisted 90° cases, and the blue one shows the 180° twist case. To solve, or turn into the blue case, the red case, or the other center twisted 90° case, you need to hold the white face on the right with the center needing to be twisted on the U face, which means that you will be holding the cube sort of diagonally, and do this algorithm:
( R U’ R U R U R U’ R’ U’ R2 )3
R U’ R U R U R U’ R’ U’ R2 R U’ R U R U R U’ R’ U’ R2 R U’ R U R U R U’ R’ U’ R2
If you want to cut off a few more seconds, you can execute as
R U’ R U R U R U’ R’ U’ R’ U’ R U R U R U’ R’ U’ R’ U’ R U R U R U’ R’ U’ R2
For the blue case, there are two main algorithms, these being two T permutations and a simple R and U move repetitive cycle. The two T permutations is
R U R’ U’ R’ F R2 U’ R’ U’ R U R’ F’ R U R’ U’ R’ F R2 U’ R’ U’ R U R’ F’
and the R U cycle is ( R U’ R’ U’ )5
I personally recommend the R U cycle.
Congratulations, you have solved the windmill cube!
Article by J8Cubes
Как собрать Мельницу | How to Solve the Windmill Cube | Tutorial
Куб Мельница или Windmill Cube — аналог кубика 3х3, похожий на Фишер Куб, у которого ребра и углы поменяны местами, только без псевдопаритета. Но у Мельницы есть одна особенность, которую нужно учесть в начале сборки, чтобы на последнем этапе не возникло тупиковых ситуаций. В остальном сборка аналогична стандартному кубику Рубика.
Алгоритмы, которые были использованы в видео:
Пиф-паф — RUR’U’
Сборка второго слоя:
U R U’ R’ U’ F’ U F — переставить ребро вправо
U’ L’ U L U F U’ F’ — — переставить ребро влево
Для сборки желтого креста:
«палка» — F ( R U R’ U’) F’
«галка» — F ( R U R’ U’)x2 F’ или F ( U R U’R’) F’
«точка»- «палка»+»галка»
Перестановка ребер верхнего слоя:
R’U2 RU2 R’F RUR’U’ R’F’ R2U’
Перестановка углов верхнего слоя:
RU’R D2 R’UR D2 R2
Как собрать Fisher Cube https://youtu.be/KfeDuy4n72Q
Как собрать Ivy Cube https://youtu.be/pbkfOCnnfsA
Как собрать Twisty Skewb https://youtu.be/a4TIw6B9zKs
Как решить псевдопаритет на шейпмодах кубика Рубика https://youtu.be/8ohPrsOv3jo
Как собрать кубик Рубика 2х2 https://youtu.be/hYHEYwGnLyU
Как собрать кубик Рубика 3х3 https://youtu.be/bvC_nEzCi5M
Как собрать кубик Рубика 4х4 https://youtu.be/v5ytiOyTFSA
Как собрать кубик Рубика 5х5 https://youtu.be/H4PlvjtFByM
Как собрать мегаминкс https://youtu.be/WgoguOY3tKI
Как собрать пирамидку https://youtu.be/yKhPH0atyGE
Как собрать скьюб https://youtu.be/EICw3aqn6Bc
Видео Как собрать Мельницу | How to Solve the Windmill Cube | Tutorial канала Алексей Ярыгин
ЛЕГКИЙ способ СОБРАТЬ КУБИК ФИШЕРА.

Как собрать Фишер Куб 4х4 | How to Solve the Fisher Cube 4×4 | TutorialПодробнее
ПРОСТОЙ СПОСОБ СОБРАТЬ КУБИКА РУБИКА 3×3 | 1часть |Подробнее
Как собрать Миррор Фишер Куб | How to Solve the Mirror Fisher Cube | TutorialПодробнее
Как собрать Фишер Куб(Fisher Cube)Подробнее
Обучение как собрать кубик Рубика — фишер куб.Подробнее
КАК СОБРАТЬ КУБИК МЕЛЬНИЦУ(WINDMILL CUBE)Подробнее
Как собрать зеркальный фишер кубПодробнее
Как собрать Фишер Куб | How to Solve the Fisher Cube | TutorialПодробнее
ОБЗОР MOYU FISHER CUBE | КАК СОБРАТЬ ФИШЕР КУБ? + РОЗЫГРЫШ 🎁Подробнее
Как собрать кубик Фишера гайд.#обучениеПодробнее
Как собрать Кубик Фишера или Fisher CubeПодробнее
КАК СОБРАТЬ КУБИК МЕЛЬНИЦУ(WINDMILL CUBE)
Показувати елементи керування програвачем
- Опубліковано 25 бер 2019
- Магазин головоломок Сссstore — vk.cc/961ZR1
Моя группа ВК: youtubealexti
КОМЕНТАРІ • 192

Спасибо вам огромное!
С вашей помощью я теперь могу собирать самые дичайшие кубики рубика с али экспресса 😌
То чувство когда 2 элемента не правильно а он сказал что либо все либо 1😭
@Михаил Никитин я кубик розкручивал, и собирал очень много раз после этого, то что розкрутил не означает что ты его больше не соберёшь
это озночает что ты либо раскручивал кубик отверткой либо ты что то сделала не правильно
Ура! Спасибо за уроки!
Правда я сломал голову так как у меня с твоим кубиком различия с желтой и белой стороной
Тоесть если держать белым в верх то кубик получаеться в зеркальном отражении
Я пока этот догнал думал голову сломаю, а потом всё как по маслу пошло
Ура. Я собрала его! При чём это первый раз в жизни собирала кубик, да ещё и такой формы! Спасибо за видео и инструкцию!
Спасибо за понятное и максимально простое объяснение))
Замечательное видео, логично, доступно и понятно. Большое спасибо!
Всё понятно и просто после Ваших объяснений! Спасибо и удачи Вам!
Спасибо огромное!Благодаря тебе научился собирать 3х3, теперь и мельницу, большущее спасибо!Я очень рад что научился, уже собираю без видео, завтра пойду заказывать новый, и учиться собирать у тебя!)👍
КРАСАВЧЕГ. супер. объясняешь очень понятно. 3х3 не умею собирать, а этот собрал по этому уроку. Только в 3й части видео поставил на скорость 0,75 чтобы видеть. Я в восторге. Видео сохраняю в избранное. Лайк заслуженый.
Спасибо, наконец-то появилось грамотное объяснение.
Спасибо. Было полезно. Теперь ещё одну головоломку я умею собирать. Пойду учится собирать 4×4
Блин столько обучалок посмотрел , и понял только половину ,а здесь прям норм ,достаточно подробно доходчиво и главное медленно показал что бы понять как и что . Спасибо.
Все нормально)) хорошо что ты показывал)) спасибо я не умеел этого собирать, то что думал это по другому собирается, а вот уже все понятно))
Спасибо большое. Все хорошо объяснил. Собрал с первого раза. Удачи тебе
Научилась, все доступно, понятно и просто, причём 3на3 даже в руках не держала
Спасибо большое!Собрал этот кубик, все получилось.
Спасибо, я по твоему видео научился собирать
С первого раза собрала. Спасибо!
Спасибо большое за информацию я научился сделать этот кубик рубик
Класс. Четыре дня собирала, ошибку делала после » Жёлтой палочки», приходилось всё сначало делать, а потом опять ошибка и опять сначало. В видео хоть и быстро объясняется, но я включала на замедленное ииии вуаля. Наконец-то собрала. А вот обычный кубик 3 x 3 ваще не умею собирать. Это видео даже для новичка суперское! Всё понятно и ясно. Спасибо!
Ну всё спасибо! Работает даже на кубике где 3 полоски по бокам:)
Видео хорошо понятное.
Но все приёмы пришлось делать зеркальным способом; потому что углы и рёбра были наоборот, не слева как у автора,а у меня было с права.
Но всё же получилось